
Steps to Properly Load Gear onto Your Roof Rack
Key Takeaways
- Understand your roof rack's weight limit.
- Secure your gear properly to prevent damage and accidents.
- Distribute weight evenly to maintain vehicle balance.
- Check the height and dimensions of your load before hitting the road.
- Use weather-resistant gear to protect your belongings.
Loading gear onto a roof rack can enhance your vehicle’s capacity to carry additional equipment for your adventures. However, improper loading may lead to accidents or damaged gear. Here, we outline the essential steps to ensure you load your roof rack safely and effectively.
Understanding Roof Rack Types
Before you start loading your gear, it is important to know the different types of roof racks and their specifications. Proper understanding of your roof rack will help you determine how much gear you can safely carry.
| Type of Roof Rack | Features | Best For |
|---|---|---|
| Crossbar Roof Rack | Two bars across the roof | Bikes, Kayaks, Luggage |
| Base Rack System | Tracks or fixed points on roof | Aerial Loads, Cargo Baskets |
| Cargo Box | Enclosed storage with lock | Luggage, Tools, Camping Gear |
Preparing Your Load
Before placing your gear on the roof rack, consider the following steps:
- Check Vehicle's Weight Limit: Refer to your vehicle’s manual to understand the maximum weight that the roof rack can support.
- Protect Your Gear: Use protective covers or soft bags to prevent scratches or damage during transport.
- Organize Your Gear: Group items based on size and weight for easy loading and unloading.
Loading the Gear
Once you have prepared your load, follow these steps to safely load it onto your roof rack:
Step-by-Step Loading
- Lift larger items first, such as cargo boxes or kayaks. Place them centrally on the rack.
- Follow with smaller items, placing them securely around the larger items.
- Always ensure that heavier items are on the bottom and lighter items are on top to maintain balance.
Pros
- Increased vehicle capacity for adventure gear.
- Efficiency in transporting bulky luggage.
- Enhanced organization for frequent travelers.
Cons
- Potential for gear shifting during transit.
- Increased height can lead to potential clearance issues.
- Exposed gear may be susceptible to weather conditions.
Securing the Load
Once all of your gear is positioned on the roof rack, secure it properly:
- Use Straps: Always use durable straps or tie-downs to keep your items firmly in place. Ensure that they are tight and secured to prevent any movement.
- Check Gear Height: Ensure that your gear does not exceed the height of your vehicle.
- Inspect Before Driving: Double-check to make sure everything is secure before you start driving.
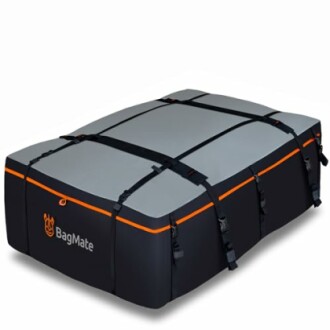
Helpful Gear: Roof Cargo Carrier
If you're looking for additional storage for your travels, consider investing in the Heavy-Duty Waterproof Roof Bag. This roof bag is designed for compatibility with or without a rack, allowing you to maximize your vehicle's storage space effortlessly.
 Ultimate Travel Companion
Heavy-Duty Waterproof Roof Bag
This spacious soft luggage carrier is perfect for road trips, providing 23 cubic feet of storage space for all your needs.
Learn MoreChecking Your Setup
Finally, secure your roof and confirm everything is loaded correctly. Here are a few last checks to do:
- Verify all gear is tightly secured and cannot shift during transit.
- Conduct a visual inspection to ensure that no items are sticking out excessively.
- Test drive a short distance and check for any movement or changes in handling.
Tips for Beginners
- Practice loading the roof rack at home before your trip to familiarize yourself with the process.
- Use colored straps or flags to mark visibility and ensure your gear is noticed by others.
- Consider investing in a roof rack adapter if your vehicle doesn't have built-in racks.
Learn More About Roof Racks
For more information and in-depth guides, check out our resources:
- Understanding Roof Racks
- Choosing the Right Kayak Rack
- Finding the Best Bike Rack for Your Needs
- Essential Guide to Trailer Hitches
- All You Need to Know About Brake Controllers
Conclusion
By following the steps outlined in this guide, you can ensure the safe and efficient loading of gear onto your roof rack. Properly managing your load not only protects your belongings but also enhances your vehicle’s stability while driving. Happy travels!